Shaw TV Red Deer found our website the other day and decided it’d be a great story to share. Check out the video and let us know what you think!
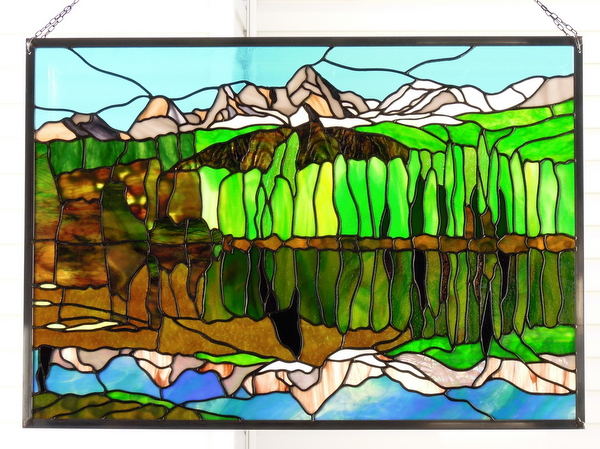
Island Lake
Island Lake in glorious sunshine. We used a lot of very interesting wonderful art glass from Spectrum, Bullseye, Uroboros, Wissmach and Kokomo to complete this panel which measures with the 1/2 zinc frame 26.5 inches wide by 18. 5/8 inches high. If you scroll down to the bottom of this posting you will see the photograph from which Martha at Paned Expressions Studios in Edgewood Maryland used to create this awesome reflective design scene. Island Lake is located near Fernie BC and it is here that our daughter Tanya and Sean were married a few years ago.
Design by Paned Expressions Studios
All of the pieces for Island Lake have now been cut and rough ground. Next step is to fit and foil then the panel will be ready for soldering.
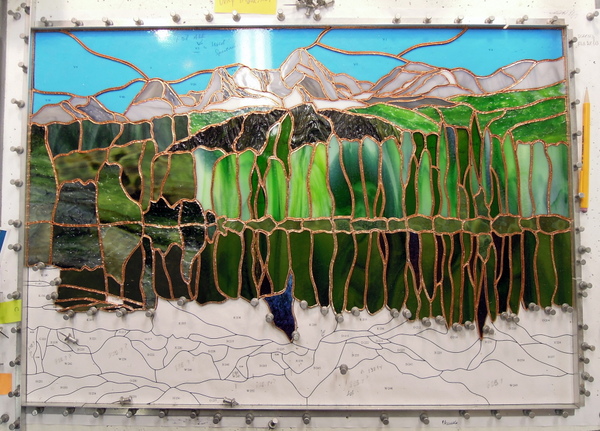
We have now finished about 2/3 of the Island Lake panel which when finished will consist of 257 pieces of stained glass. The next process will be to insert tracing paper and draw out the remaining pattern pieces on the tracing paper. Then we cut them out and glue them to the glass we want to use along with ensuring that the we obtain the glass direction we desire for each piece as well when deemed desirable we will sometimes reverse a particular pattern piece and glue it on the reverse side of textured glass in order to enhance the panel.
We have now traced another 50+ pieces and glued them to the respective glass pieces which have been cut. We now rough grind to the paper, remove the paper, fit each piece one at a time, foiling each piece as we go. Some of the pieces have the paper on the reverse side of some of the glass as we want to use the rougher side for effect.

It has been a very busy Christmas season and we are now ready to paper and start the next reflective portion of the Island Lake panel. We are in the process of tracing out each piece on white freezer paper, selecting the glass and gluing each individual cut out piece to its appropriate glass piece. More updates to follow as we continue it’s construction.

We now have a lot of new pieces cut out and ready to be ground, fitted in place and as each is completed that piece is foiled and burnished.

The mountains are now completed with a number of different glasses used. Next we will finish down to the water line.

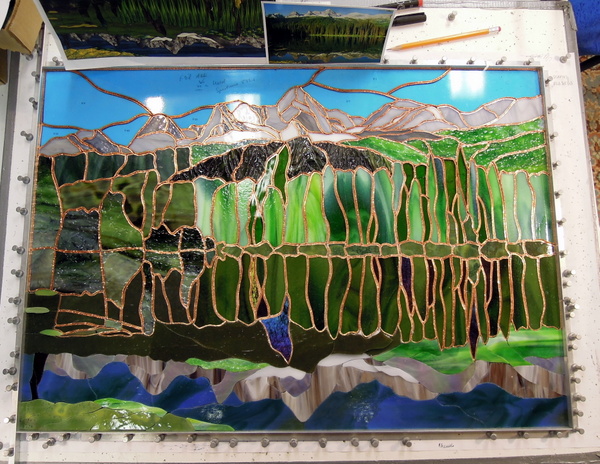
We continue to work on the Island Lake panel and here is an updated photo as at May 29, 2013. We continue to trace and apply to the various pieces of glass and have now sorted out all of the glass and color combinations we intend on using in this panel.

We place white freezer paper over the pattern, then trace out each piece. Once done we cut out and glue to the glass on the angles and directions that we want the glass to flow in the design.

The mountains are beginning to take shape. We are using a combination of Spectrum and Wissmach glass with Spectrum’s Thunderhead being reversed for effect.

For the blue sky we used Spectrum’s #533.1 and with the sky now completed we will start on the mountains.

We now have most of the glass necessary to complete this panel, which is shown below we use the Morton Glass Caddy which works great for holding the glass for our projects.

In view of the complexity of the picture we once again enlisted Paned Expression Studios to come up with the design for this panel from the picture. We have now started to construct the panel and will continue to post pictures and updates as it proceeds.

Design by Paned Expression Studios
To whet your appetite and let your artistic minds wander and contemplate? What will be done to turn this beautiful Island Lake photo near Fernie British Columbia into a stained glass panel?

Rebuild – Restoration Old Came Window
We have now completed the restoration of this came window, complete with new bevels and clear glass where required. As well we installed the Youghiogheny art glass for our client.
It is a pleasure to restore these old windows.

This picture was taken later in the day and shows how different sunlight angles change the look of these old came windows.

We have now cemented this panel on each side and this shows the Whiting application process. We have done this on both sides of the panel. This process sets in motion the hardening of the cement and we always allow at least 2 days for each side for this process.. We then clean the came with steel wool (#0000), apply black patina, use Kwik Clean to the clean the window after applying the patina. We have today applied stained glass polish to both sides of the window. Once dry, final cleaning and polishing will be done and the finish project will be ready for our client. Final pictures of the restored window will follow in due course.

Now we are starting the cementing process. We like to use AmChem Stained Glass Putty as it stays soft and is easy to work with. If to hard one just adds a little Linseed Oil if too soft you can add some Whiting in order to have the consistency that works best. Vinyl gloves, small putty knife and an old fid work very well to get the putty into the came joints. Once that is done we then use Whiting to clean the panel, scrubbing the came, this process begins to “set the compound” It is best to leave the panel flat for at least 48 hours for the cement to set.

With all of the came joints now soldered we get to see the window in a daylight setting for the first time and how everything looks especially with new glass colors that our client requested. The 4 pieces around the bevel cluster were all cut from one piece of Youghiogheny glass to match together.

The front side joints have been soldered and we have turned over the panel to solder the reverse side joints.

This picture shows the window with all glass now in new lead came and ready for the joints to be soldered.

Here is the window with just a few remaining pieces to be put in. A little delay as we were blessed with the arrival of our 1st granddaughter a short while ago. We have now put in all of the bevels including the replaced broken on the top right of the center bevel cluster. In addition we had 2 new bevels made to replace the clear glass that was under each of the larger curved bevels.

The rebuild process continues, our client wanted to surround the bevels with the same Youghiogheny glass that is being used in the triangles around the edge of the window. We just rough cut the 4 pieces, after drawing them out from the existing pieces one of which was broken. As these were cut from the same panel they will match across. They appear darker but only due to lighting when taking the photo. We will start at the top and work down along with putting the bevels in place as we proceed.

Reconstruction of this 50 – 70 year old came window continues. We are now getting to the center where new Youghiogheny art glass will be replacing the clear around of the bevels. You will note that some of these clears were broken and now replaced. A new bevel will replace a broken one together with 2 new additional bevels being added.
Also the the outer rim of clear glass triangles is also being replaced with the same Youghiogheny #YO – 5502SP Beige with Dense Beige Stipple.

The things you find out when rebuilding 50 – 70 year old came windows? The number of nicks and scratches that happened to the glass pieces over the years only really show up once you wash and clean away the years of dirt, paint spots etc. We realized that a lot of this glass was 5 mil in thickness while some only 3 mil which necessitated using a different size came. What is wonderful about rebuilding these old came windows is that you have a chance to see how the artist of many years ago built the window with limited tools, which certainly is not the case today. You also come to the realize that the artist that originally built this window is probably no longer alive and your hands are now touching pieces of glass last held by this unknown stained glass artist from so many decades ago and one marvels at how well they plied their skills.
We are now starting to work on the interior portion of the window and replace some pieces with some Youghiogheny Art Glass. Enjoy

We have now laid out the window on 3/4 inch plywood with wooden strips on 3 sides, as well as cut the zinc came so we will end up with the same as the original window.
Now that all is exact we will start the restoration/rebuilding process. Each piece of glass will be cleaned and re-numbered again to ensure it’s exact location. We have stretched a couple pieces of came and will also insert steel strong line reinforcements internally in the came to ensure that the window will not bow out or collapse for many decades to come. As construction progresses we will continue to post updates and more pictures.

A client recently brought us this old came window which was rescued from a home in Central Alberta. The window is in poor shape with bulging and broken pieces of glass and a broken bevel. The first picture shows the window in it’s original wooden frame.

Here is a close up of the bevel area. The right curved bevel needs to be replaced and the area underneath each of these curved bevels our client would like to have bevels made to replace the current clear glass. In addition to replacing other broken glass, some new colored glass is going to be installed.

We are now in the process of getting the broken bevel and the new ones made.
In the next picture we have taken the window out of it’s wooden frame, numbered each piece and have now taken the window completely apart. In due course we will show the reconstruction of this window.

Great Blue Heron Panel
The Blue Heron Panel measures 28 in by 18 in, this photo taken in full sun. What always fascinates us about stained glass is how it changes with the light from sunny, cloudy, rainy, snowy days along with time of the year and the ever changing seasons.

Design by Mark Waterbury
The Blue Heron Panel is now finished and is in it’s final cleaning and polishing stages. We will post a picture of the panel in full sunlight in the next few days. For the water we used Spectrum’s Pale Green/Aqua Blue Waterglass and matched it across the panel along with the sky using Kokomo’s 14SPL. For the bull rushes we used Spectrum’s Brown on Gold Streaky Granite and for the leaves a Brown/Green Kokomo 59L.

We now have cleaned the panel’s solder lines with steel wool and applied black patina. Next step will be to make the frame. The first photo is of the front of the panel, while the second photo is of the reverse side.


Here is the Blue Heron Panel with the front side soldered and all the flux has been removed using Kwik Clean. Next step will be to finish the reverse and then we will clean the solder with #0000 Steel Wool and then patina all of the solder lines black.

We now have finished burnishing on the copper foil overlay on this blue heron panel. The next process will be the soldering of the panel which will be somewhat difficult due to the narrow pieces of glass and the copper foil overlays as too much heat could crack the glass.

We just finished putting in all of the pieces of glass today(October 25, 2012), now we have to put on the copper foil overlay (re legs etc.) and once that is finished will post another picture with that burnished on, then the panel will be ready for soldering.

This is the latest construction photo of the Great Blue Heron Panel as at Oct 11, 2012.

This is an ongoing construction photo gallery of this Great Blue Heron Oval Panel which we are making for a home in Toronto. The oval panel measures 18 inches wide by 28 inches high.
Below is Picture # 3
We have had a very busy year with many extenuating circumstances which prevented us from spending time in our studio, all that now remains to be done is the Heron and the foil overlays. Then of course soldering, cleaning, black patina cleaning, polishing and framing.

This is picture # 1 the start of construction

Panel designed by Mark Waterbury
Featured in Glass Patterns Quarterly Winter 1990/91
This is picture # 2

We used Spectrum’s 423-1W Pale Green/Aqua Blue Waterglass for the water and it is matched all across the design. For the bull rushes we are using a Kokomo # 59L.